Hope you all had a wonderful Thanksgiving.
Just a few things I wanted to share today.
I know many of you will be interested in the fact that we received a shipment of new Magnolia Stamps -- lots of Christmas stuff + the magazine.
If you are looking for inexpensive gift ideas/stocking stuffers, these plastic tubes are your answer. At only .99 each you can give alot of these out! Fill with candy, hot chocolate and marshmallows, money, anything you can think of.... Pam made this beautiful frame while she was in the store the other day--another great gift idea! Remember you can stop by anytime and create in our workshop. Sometimes it's easier to get things done right in the store rather than at home where things like laundry and dishes are calling your name!
Sunday, November 28, 2010
Wednesday, November 24, 2010
Giving Thanks
New Toys
We have a new "toy" in that you will want to play with. For all of you who love the look of stitching on your pages and cards but either don't know how or don't have a sewing machine...here's the answer!
It's called Sew Easy and here's a little video about it. We will also have it available to try as a make and take this Saturday. So stop by and check it out!
Sunday, November 21, 2010
Stamp of the Week
Messenger Bag
Jillian is coming back to teach at Scrapadoodle. She'll be helping you create this fun bag you can give as a gift or keep for yourself. Come play with new techniques and products you make have never tried before. Class is Sunday December 5th. This is one of those you need to see in person--lots of cool textures going on here. Stop by and check it out!
Thursday, November 18, 2010
Don't be scared!
A lot of people are intimidated by the whole idea of stamping. And this is what I tell them. If you want to dip your toe in the water, these are the stamps to buy. We have TONS of these little stamps in every section of our store for every theme you can think of, and the best part? These stamps are ONLY .99 CENTS!! It's a great way to try it out. Just peel the clear stamp off the plastic it comes on, slap it on an acrylic block (we have plenty in the workshop if you want to use one of ours or just use a CD case), put some ink on it, and stamp away. Another advantage of these little stamps is that even if you only use it a couple times, you've only spent a dollar! Here's a card I did with him....I used watercolor pencils to color him but Copics would be great too....
Peachy Keen
Monday, November 15, 2010
Random Inspiration
Saturday, November 13, 2010
Stamp news
Teresa has given our stamp section a beauty makeover for the holidays--looks so pretty doesn't it? We'll have lots more stamps arriving so keep an eye on this section of the store. We've also started a new program with Hero Arts stamps. Each week in November a certain stamp will be chosen for you to buy at 20% off. Here is this week's stamp:
Thursday, November 11, 2010
Retreat
A big thanks to everyone who attended our retreat last weekend. It is amazing to see so many talented ladies come together and create so many great layouts. Also to Amy who always does such a nice job planning and making these retreats go so smoothly! Stay tuned for January when we'll be doing it all again....
Tuesday, November 9, 2010
Punched flowers
Recipe
The lucky girls at our retreat got to have this for dessert and Lynne promised to pass along the recipe:
PUMPKIN CRUNCH CAKE
1 15 oz. can Pumpkin
1 can Evaporated Milk
3 Eggs
2 T. Cinnamon
1/2 t. Salt
1 1/2 Cup Sugar
1 Cup Melted Butter
Pecans
1 Yellow Cake Mix
Mix pumpkin, milk, eggs,cinnamon, salt, and sugar
Pour into 9 x 13 pan
Sprinkle cake mix over mixture
Place pecans on top
Drizzle butter over top
Bake at 350 for 50 - 60 minutes until lightly brown.
We'd love to share some of your favorite holiday recipes! Send us a picture and the recipe (info@scrapadoodle.com) and we'll post it here to share! Better yet, have you done a layout for your favorite dish? We'd love to see those too!
Friday, November 5, 2010
Your kids will love this!
Thursday, November 4, 2010
Halloween at Scrapadoodle
It seriously doesn't get much more clever that this. Check out this costume: The flashing warning signal on her head? She made it ON HER CRICUT!! Isn't that awesome? That's why scrapbookers are so fun to be around right? Coming up with ideas like that. And watch out for that witchy girl....she hangs around the store alot.....
Wednesday, November 3, 2010
Wall Art
Monday, November 1, 2010
A Copic mini-lesson
When coloring a pumpkin your basic color is orange. Copic makes a nice range of oranges, or YR's so let's talk about how to get the most from your YR markers and how you can increase your contrast by breaking away from the color families.
YR: Yellow-Red
There really aren't that many YR markers, especially when you compare them to a color family like the blues. YR is a secondary color on your color wheel and is made from yellow and red dyes mixed together to achieve orange.
If we start with the first YR's, the YR00 family, we have a lot of colors to choose from. YR000, YR00, YR01, YR02, YR04, YR07, and YR09. For basic coloring I suggest keeping a 2-3 digit difference and you know that your colors will blend well together. However, if you remember back to my posts about contrast, our eyes are drawn to images with higher contrast- they're more interesting. My first two pumpkins are colored with only 2 colors. I used the maximum color difference that would still blend well (5 digits apart!), but both pumpkins look a little bland. The first one isn't bad, but the second pumpkin is not exciting.
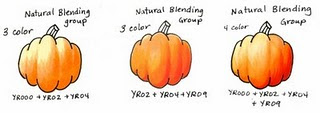
How do I make it more lively?
Add another layer of color. 3 colors look much better. 4 colors look even better than 3, and the blending looks more natural. When possible, use more colors to get a smooth blend and more contrast.
Fr: Marianne Walker
Product specialist for Copic Markers
Want to Learn more about Copic markers?
Nov 6th, 2010 (Sat) 10:30 AM - 12:30 AM
Copic TECHNIQUE BASICS
If you love to color and you are as excited about these markers as we are, you will want to come in and take this class. THIS IS A TECHNIQUE CLASS! This introductory class covers the types of markers available, inks to use with the markers, paper types, and the Copic numbering system. Students will practice basic blending, tip to tip blending, feather blending, and palette blending. Class fee includes 3 Ciao markers.
BYOB and any COPIC markers that you already own.
$20.00
Subscribe to:
Posts (Atom)