
When coloring a pumpkin your basic color is orange. Copic makes a nice range of oranges, or YR's so let's talk about how to get the most from your YR markers and how you can increase your contrast by breaking away from the color families.
YR: Yellow-Red
There really aren't that many YR markers, especially when you compare them to a color family like the blues. YR is a secondary color on your color wheel and is made from yellow and red dyes mixed together to achieve orange.
If we start with the first YR's, the YR00 family, we have a lot of colors to choose from. YR000, YR00, YR01, YR02, YR04, YR07, and YR09. For basic coloring I suggest keeping a 2-3 digit difference and you know that your colors will blend well together. However, if you remember back to my posts about contrast, our eyes are drawn to images with higher contrast- they're more interesting. My first two pumpkins are colored with only 2 colors. I used the maximum color difference that would still blend well (5 digits apart!), but both pumpkins look a little bland. The first one isn't bad, but the second pumpkin is not exciting.
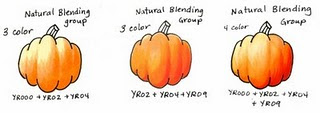
How do I make it more lively?
Add another layer of color. 3 colors look much better. 4 colors look even better than 3, and the blending looks more natural. When possible, use more colors to get a smooth blend and more contrast.
Fr: Marianne Walker
Product specialist for Copic Markers
Want to Learn more about Copic markers?Nov 6th, 2010 (Sat) 10:30 AM - 12:30 AM
Copic TECHNIQUE BASICSIf you love to color and you are as excited about these markers as we are, you will want to come in and take this class. THIS IS A TECHNIQUE CLASS! This introductory class covers the types of markers available, inks to use with the markers, paper types, and the Copic numbering system. Students will practice basic blending, tip to tip blending, feather blending, and palette blending. Class fee includes 3 Ciao markers.
BYOB and any COPIC markers that you already own.
$20.00




 Look how she used ribbon for the "chains" on the swing--great idea!

 We've also started a new program with Hero Arts stamps. Each week in November a certain stamp will be chosen for you to buy at 20% off. Here is this week's stamp:


 The lucky girls at our retreat got to have this for dessert and Lynne promised to pass along the recipe:
 Perfect for Halloween layouts or just to remember your child's love of this series of books.


 The flashing warning signal on her head? She made it ON HER CRICUT!! Isn't that awesome? That's why scrapbookers are so fun to be around right? Coming up with ideas like that. And watch out for that witchy girl....she hangs around the store alot.....

 When coloring a pumpkin your basic color is orange. Copic makes a nice range of oranges, or YR's so let's talk about how to get the most from your YR markers and how you can increase your contrast by breaking away from the color families.

